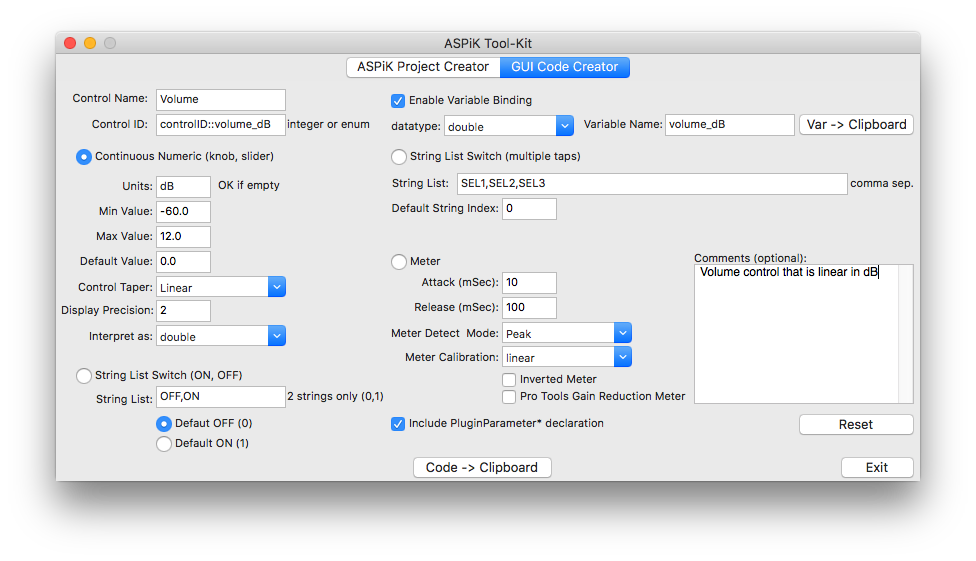
At this point, you can open up the ASPiK Tool-Kit application that is part of the SDK and use the GUI Code Creator to generate the C++ code for both the bound variable as well as the PluginParameter declaration and instantiation. NOTE: this is optional and you may always code the plugin parameters by hand. The ASPiK GUI Code Creator is useful for starting out and you can always tweak and modify the code it gerenates. Open the ASPiK Tool-Kit and switch to the GUI Code Creator. The first entry in the GUI control table is for the continuous Volume in dB control (this will map to a continous knob control on the GUI). Select the "Continuous Numeric" control type and fill in the information for the PluginParameter and the bound variable from the table. Notice how the variable name "volume_dB" matches the unique control identifier which also matches the previously declared enumeration. Also, since this is our first parameter, we have c checked the "Include PluginParamater* declaration" box - you only need to do this once for the first parameter you define.
With this data set, you can now generate the C++ code and paste it into your plugin project:
Bound Variable Code:
goes in the plugincore.h file in the "private" area provided for your member variables; click the [Var -> Clipboard] button to copy the code to the clipboard, then paste it into the plugincore.h file; note that it will add a default declaration value based on the default value you declared in the GUI Code Creator app.
PluginParameter instantiation Code:
goes in the PluginCore::initPluginParameters( ) function at the top just after the if (pluginParameterMap.size() > 0) statement. Click the [Code -> Clinpbaord] button to copy the code to the clipboard, then paste it into the PluginCore::initPluginParameters( ) function;
Parameter Smoothing
ASPiK features automatic parameter smoothing for continuous controls. It can be applied to any continuous control and is a local option, that is, it can be applied to individual parameters (or not at all) and parameters can have different parameter smoothing times (see the Pirkle text for much more information). Most programmers will use the same smoothing time for the majority of their controls. Therefore, parameter smoothing is set on the ASPiK Project Creator panel as a sort of global option. To use it, just open the ASPiK Project Creator panel and check the box along with a default smoothing time in milliseconds. You don't need to create a new project or anything - the parameter smoothing time is the only data that carries over into the GUI Code Creator panel. If you set up parameter smoothing you will have a few more lines of code added - note that you may manipulate the functions later to turn off parameter smoothing or change the smoothing time. These additional lines will be added after the instantiation:
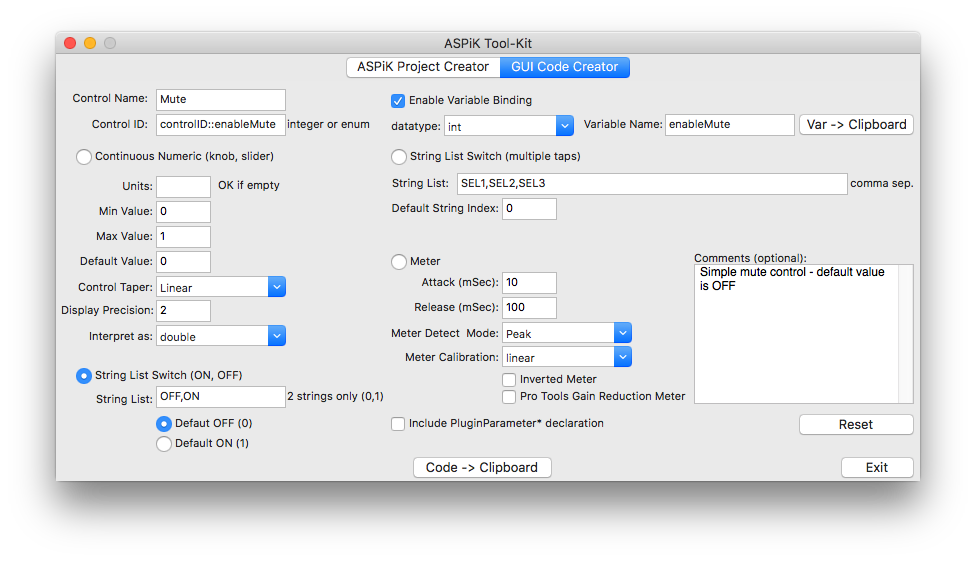
Now you can add the other member variables. Next up is the Mute switch; it is implemented as a String-List parameter with two strings: OFF and ON that determine its state. Hit the [Reset] button on the GUI Code Creator to clear out the last entry. Then, select the "String List Switch (ON, OFF)" parameter type. In this case, we will use the default string list of OFF,ON and set the default to the OFF (0) state. Note that you can name the pair of strings however you like (e.g. ENABLED, DISABLED or OUI, NON) knowing that the first string will map to the value (0) while the second maps to (1). Notice also that we've de-selected the "Include PluginParameter*..." switch.
You can now add the bound variable to the plugincore.h file and the parameter instantiation code to the plugincore.cpp file as before, pasting the code in sequence. First, notice how the String-List bound variable declaration resulted in two lines of code; one for the GUI control receiver variable (enableMute) and the other as a strongly typed enumeration that uses the variable name concatenated with "Enum" - this is to allow you to easily evaluate the state of the GUI control item using the built in MACROs that are listed in the SDK. You may decide to use other methods to identify the state of the receiver variable if you wish, but we use the strongly typed enumeration method in the sample code. In ASPiK, String-List controls are ALWAYS bound to variables with the int data-type and using the [Var -> Clipboard] feature will always bind an integer type regardless of what you choose in the drop-list.
Next, you can paste the code for the string list parameter just below the instantiation for the first parameter:
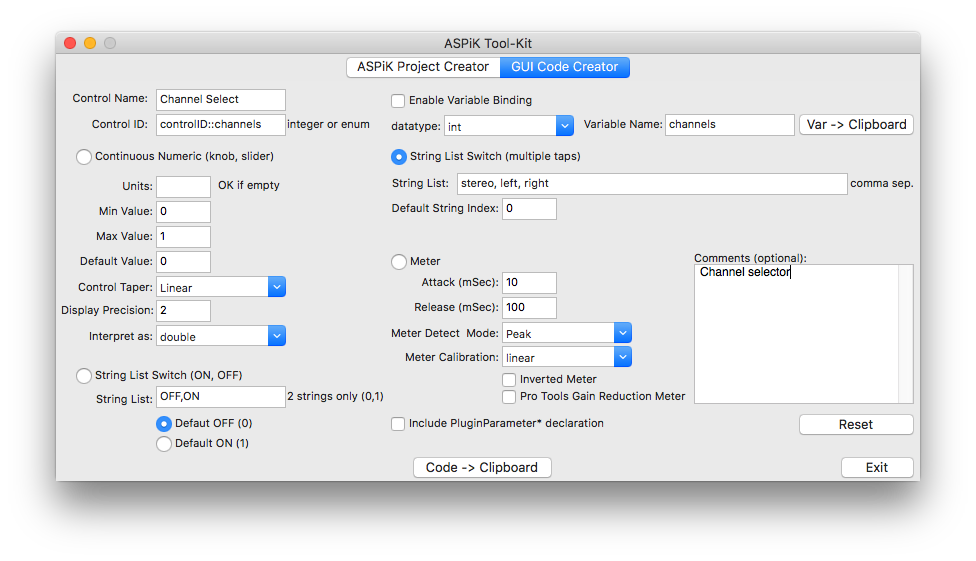
Next up is the channel selection GUI control. This is done with another String-List, but this one will need more than just two states. Reset the GUI Control Creator and select the "String List Switch (multiple taps)" parameter, then enter the information from the GUI control table. Notice that you specify the default value with an unsigned integer index - the list is zero-indexed, so the first item is number 0, the second is 1, etc...
Once again use the [Var -> Clipboard] and [Code -> Clipboard] buttons to generate and paste the code into your plugincore.h and plugincore.cpp files:
Then, you can paste the code for the string list parameter just below the instantiation for the first parameter:
Our last parameter to encode is an output parameter in the form of a VU meter on the GUI. In ASPiK, meter controls are ALWAYS bound to variables with the float data-type and using the [Var -> Clipboard] feature will always bind a floating point type regardless of what you choose in the drop-list. Once again reset the GUI Control Creator panel and select the "Meter" parameter type, then add the information from the GUI control table like before.

Once again use the [Var -> Clipboard] and [Code -> Clipboard] buttons to generate and paste the code into your plugincore.h and plugincore.cpp files:
Then, you can paste the code for the VU meter parameter just below the instantiation for the last parameter:
At this point, all of the plugin bound variables and plugin parameters have been declared and defined. We can now move on to the plugin's reset operation.