ASPiKreator
Ther SDK comes with a Mac and Windows applicatation named Aspikreator.app and Aspikreator.exe. These apps contain two sub-apps: the ASPiK Project Creator and the GUI Code Creator.
The ASPiK Project Creator generates new (blank) ASPiK plugin projects for both Mac and Windows. NOTE: you only need ONE or the other to generate projects for BOTH operating systems; the Mac ASPiK Project Creator can generate the CMake files and projects for Windows and vice-versa. You will need to run CMake on the target operating system after the projects are created. We will discuss the GUI Control Creator in the section that involves writing your first plugin.
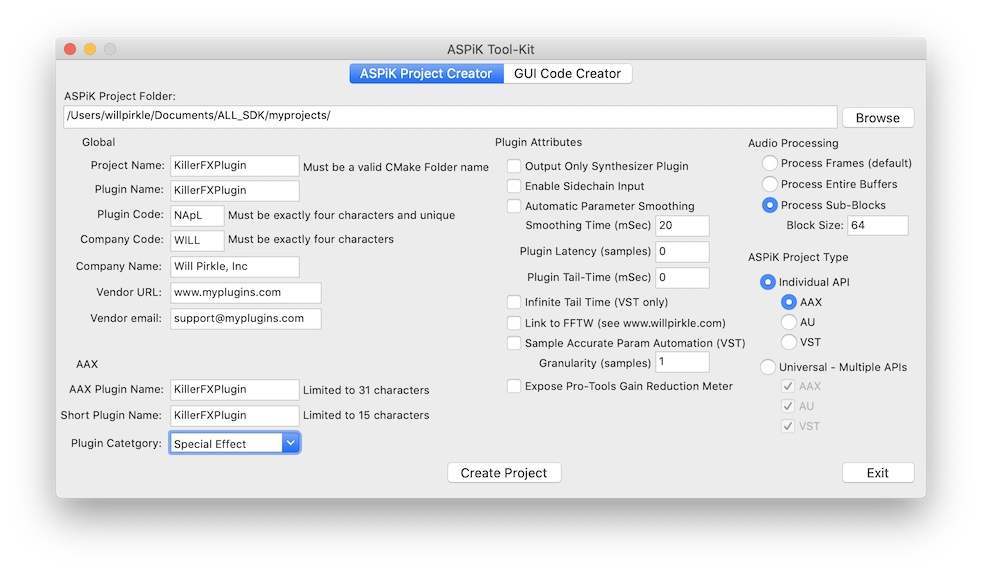
The main panels for both Mac and Windows versions have identical controls and the Mac version is shown here for a plugin project named ASPiKompressor:
Using the ASPiKreator software is super-easy. You only need to set a few text fields and check a few boxes to generate new plugin projects.
Project/Plugin Naming
The project name will become the name of the plugin file; e.g. if the project is named ASPiKompressor, then the AAX plugin will be named ASPiKompressor.aaxplugin, the VST will be ASPiKompressor.vst3, and so on. However, the plugin APIs also specify a plugin name string that is independent of the acutal file name. BUT, different DAWs will expose the plugin names to the user in different manners - some will use the filename while others will use the internal name string. The simplest solution is to name the plugin and the project identically, however the choice is yours and you can always tweak this in the individual plugin shell code, to which you have full access!
Step 1: Setup the Target Folder
Choose the destination ASPiK project folder as described on the ASPiK Project Folder page. For Universal projects, you will almost always be writing to the same project folder. For individual projects, you will likely need to change this folder. Use the [Browse] button to locate the folder. In this case, we are creating a universal plugin project so we use the .../ALL_SDK/myprojects folder as seen in the figure above.
Step 2: Set your Project Attributes
Fill in the text fields for the various components and choose the AAX category; check all the boxes that apply to your project. Select the type of project (universal or individual) and choose the APIs to include. Make sure you set the Plugin Code to a 4-character sequence unique among YOUR products.
Step 3: Choose the Audio Processing
Starting with ASPiK 1.6.8, you may now setup the project to process audio in three different ways (this has always been available, but required the user to add this code - now that is done for you). .
- Process Frames: this is the default mechanism that sets up processing on each sample interval so that you process one sample per channel at a time; this is conceptually the simplest (great for newbies) but is the least efficient on the CPU.
- Process Entire Buffers: in this paradigm, you process entire buffers directly from the DAW's buffer pointers; each channel has its own buffer (explained in my FX plugin book in high detail). This is the most CPU efficient and will produce blazingly fast code.
- Process Sub-Blocks: here, the incoming DAW buffers are broken into sub-blocks with a block-size that you prescribe. You still operate directly on the DAW's buffers (so it is also very efficient) but you operate on chunks of audio at a time; this is a common paradigm for synth plugins, or if you are working with FFTs of a set length. NOTE: if a partial block arrives from the DAW (this used to be common, but is now somewhat rare) then the entire partial buffer is sent to your processing function.
Note: The PluginCore already contains two example sub-block processing functions named renderFXPassThrough and renderSynthSilence that demonstrate how to iterate over the sub-blocks for processing as well as setting up the GUI parameter transfers (cooking functions) for your objects.
Step 4: Create the Project
Use the [Create Project] button to spawn off a new project folder and setup the CMakeLists.txt file with the values from the ASPiKreator interface. With the new project in place, you only need to run CMake to generate the Visual Studio and/or XCode compiler project to build your plugins.
Step 5: Save your Settings
Use the [Exit] button to quit ASPiKreator - when you use this button (and not the X close toolbar button) your settings will be saved for: company name, 4-char company ID, company URL, company email, and your ASPiK Project folder. Note that all of the other attributes must be set for each plugin project (many items are necessarily different).
Step 5: OPTIONAL - Customizing Project Creation: Template Source
The ASPiKreator uses a special copy of the PluginTemplate folder that you find in the SDK. This special copy is slightly different in that the CMakeLists.txt file includes special text placeholders, and the ASPiKreator softare uses them to fill in the file with your settings. However the rest of the PluginTemplate is unmodified. If you want to modify some of the code in this template so that each new project includes your additions, then you may do that by simply modifying the files that the ASPiKreator uses. You may even add files to the template so that they will be automatically copied to each new project, but you will need to manually add them to the compiler if they are source files.
MacOS
The Template Source is located within the ASPiKreator bundle itself; right click on the application and choose "Show Package Contents" then browse to the Resources folder, where you will find the special template folder that you may modify
Windows
The Template Source is located within the ASPiKreator folder that you find in the C:\Program Files folder, in parallel with the ASPiKreator.exe binary. You may modify this template folder as you wish, but you will need admin privaleges to do so.